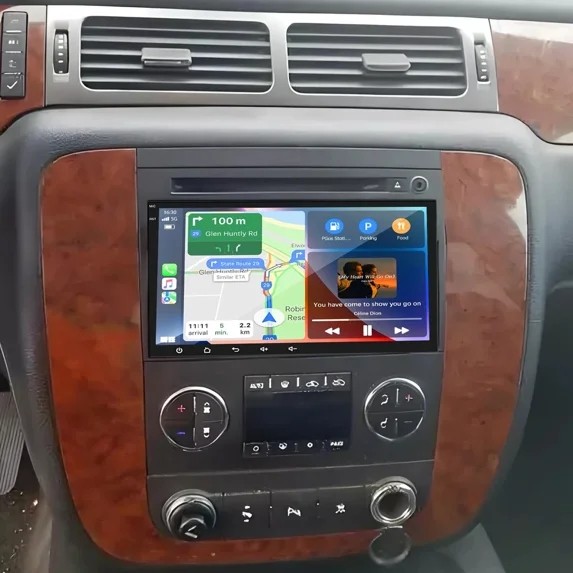
8" For Chevrolet Avalanche 2007-2013 4+64G Android 15 Car Stereo Radio GPS Navi For Sale - New and Used
When you click on links to various merchants on this site and make a purchase, this can result in this site earning a commission. Affiliate programs and affiliations include, but are not limited to, the eBay Partner Network.

8" For Chevrolet Avalanche 2007-2013 4+64G Android 15 Car Stereo Radio GPS Navi:
$176.79
DESCRIPTIONPAYMENTSHIPPINGRETURN POLICYCONTACT US Shop CategoryStore Home Car Radio-01◈US 折扣 Car Radio-02◈HOT SALE◈NEW SALE◈OE CAR PARTS (10% OFF ) Car Radio-03 Car Radio-04◈AUTO PARTS◈Limited-time Big Sale Car Radio-05 Car Radio-06 Car Radio-07 Car Radio-08 Car Radio-09◈NEW SALE◈hot sale Car Radio-10 Car Radio-11 OtherHot Item Car Stereo Radio For Jeep Patriot Compass 2009-2016 Apple Carplay GPS Android 15 USD 135.00 8" For Dodge Charger Magnum 2005-2007 Car Radio CarPlay Android 15 GPS Bluetooth USD 194.00 10" For 2013-2015 Nissan Altima CarPlay Car Stereo Radio Android 15 GPS Navi SWC USD 149.00 For 2011-2014 Jeep Wrangler 3 JK Apple Carplay Car Radio Stereo Android 15 GPS USD 244.99 Car Stereo Radio For 2005 2006-2010 Scion tC Android 15 CarPlay 7" GPS Nav +CAM USD 120.00 New List Item For 1994-2000 Ford Mustang Carplay Android Auto Single 1Din Car Stereo Radio USB USD 128.19 Transmission Valve Body U660e W/7 Solenoid Fit For Toyota Camry Alphard 6-Speed USD 417.36 Car Stereo Radio For Ford Ranger 1989-94 Carplay Android Auto BT FM Single 1Din USD 128.19 For 1992-1996 Ford Bronco Carplay Android Auto Single 1Din Car Stereo Radio USB USD 128.19 86130N9000 Left Driver Windshield Pillar Molding For 22-24 Hyundai Tucson USD 53.02 Help & InfoPayment PolicyShipping PolicyReturn PolicyFAQAbout Us For Chevrolet Avalanche 2007-2013 8" 4+64G Android 15 Car Stereo Radio GPS Navi Features:
Vehicle fitment: this car stereo radio is compatible forGMC Yukon 2007-2014, compatible forC-hevrolet Avalanche 2007-2013.
Wireless & wired car-play: you can choose wired connection or wireless connection to car-play, connect to iOS mobile phone, access mobile phone address book, mail, notification, map navigation, music, video and other information, and realize voice control.
Wireless & wired Android-auto: built-in wireless Android-auto car system can closely integrate the user's Android phone and player, and realize navigation, make calls, send and receive information, listen to music and other operations via data cable connection.
Built-in WIFI: connect to WIFI, you will find a new world, the most convenient is the online map. Built-in bluetooth hands-free and phone book to play music directly over the phone. (You need to agree to the phone authorization and contact information for syncing your phone settings.)
Built-in GPS navigation: you can purchase directly from play store for offline navigation. With wifi connected, Google Maps can be used perfectly, you can go anywhere you want and never get lost again.
Split screen function: two pages can be displayed at the same time, such as navigation and music display at the same time.
Steering wheel control: through it you can control the functions you need through steering wheel, more convenient.
AHD Rear view camera input: after connecting to the rear view camera. The radio automatically displays the reversing image as soon as you engage reverse gear. Make your daily reversing easy. Support AHD camera.
Support external microphone.
Note: Please check your car model before you shoot your order, calculate the year and model number and check the compatibility, or send us a complete image of the plugs on the back of the center console and on-board main unit(as the picture shown) to make sure it matches exactly and help you confirm if you need any other wiring harness or />Material: plastic, metal
Voltage: 12V
Operation system: Android 15
Screen size: 8inch 2.5D Capacitive touch screen
Memory: 4GB(RAM) + 64GB(ROM)
Unit size: 2 Din
Power output: 4x45W
Audio format: MP3, MP2, AAC, OGG, FLAC, APE, WMA, WAV, RM, AC3
Fitment:
Compatible forGMC Yukon 2007-2014
Compatible forChevrolet Avalanche Please check your car model before you shoot your order, calculate the year and model number and check the compatibility, or send us a complete image of the plugs on the back of the center console and on-board main unit(as the picture shown) to make sure it matches exactly and help you confirm if you need any other wiring harness or adapters. Package includes:
1 x Car Stereo Radio Set
How to Wire a Car Stereo Quick Overview of Wiring a Car Stereo - Disconnect the battery.
- Remove any necessary trim and take out the old stereo.
- Disconnect the wiring, but keep it in its plastic clips.
- Find and connect all loose wires (using an output converter, if needed).
- Secure all your wires into place, using methods like soldering or twisting.
- Test the stereo and install it into your car.
- Secure the stereo with bolts or spring clips and reinstall the old trim.
Part 1 Remove the Old Stereo 1 Disconnect the battery. Because you will be working on the electrical system of your car, it’s important to disconnect the battery before you get started. If you aren’t sure where to locate the battery in your vehicle, refer to your owner’s manual; most car batteries can be found under the hood, but some are kept in the trunk. Once you locate the battery, use a hand or socket wrench to loosen the black cable from the negative terminal on the battery. You will not need to remove the bolt entirely, instead simply loosen it enough to pull the cable off of the terminal. Tuck the cable down to the side of the battery so that it can’t come back into contact with the terminal. - You do not need to remove the battery or disconnect the cable from the positive terminal.
- To be sure the battery is disconnected, check to see if the lights come on in the cabin of the car. Nothing electronic should work with the battery disconnected.
- Disconnecting the battery will prevent you from doing damage to the electrical system as well as protect you from Remove any necessary pieces of trim. You will need to gain access to the sides of the stock head unit (or stereo) in your center console. In some cars, that will require the removal of some pieces of plastic trim. Be careful when removing trim pieces, as they may be brittle and subject to cracking. Whenever possible, try to pull the piece of trim out slightly to get a look at what kind of clip is used to attach it. You may need to slide the trim piece in a certain direction to separate it, you may need to hit a release with a screw driver, or you may need to simply pull on it hard enough. Checking first will prevent you from breaking off the clips and having to replace the piece of trim.
- Consult your car’s repair manual if you want to determine the best way to remove pieces of trim that are in your way.
- Set the trim aside where you won’t accidentally sit or step on it as you Determine how your head unit is mounted. Car stereos are all held in place using one of two methods: spring clips or bolts. Each method requires a different technique for removal. In order to determine what method your car uses to secure the stereo, you can consult your car’s repair manual or look closely once you’ve gotten the trim out of the way. Spring clip mounts may not require the removal of any trim pieces and can be identified by the matching pairs of holes on either side of the stereo. Stereos that are bolted into place may require more trim removal, as you will need to gain access to the space behind the stereo.
- Look for two pairs of matching holes on the left and ride side of the stereo. If they are present, your stereo is held in place with spring clips.
- If there are no holes, remove the trim below, above or to the side of the stereo to gain access to the Use DIN tools to remove spring clipped stereos. If your stereo or head unit is held in place using spring clips, you will need to purchase a pair of DIN tools. DIN tools look like thin pieces of metal bent into the shape of the letter “U” with slightly hooked ends. Insert one DIN tool into the two holes on the left, and another into the two holes on the right. Press them both in until you hear the click of the spring releasing. Spread the tools apart slightly to grip the back of the stereo and pull the tools toward yourself. The stereo will slide out of the console of the car along with the tools.
- In a bind, you may be able to use pieces of a metal coat hanger to create your own DIN tools.
- If the stereo doesn’t come out, it is likely stuck by a piece of trim. Don’t force it out, instead look for any obstructions that may be preventing it from Remove a bolted in stereo with wrenches. You will likely need to remove quite a bit more of the trim to access bolts that hold your stereo in place than you would have with spring clipped stereos. Once you are able to see the bolts, removing the stereo should be fairly self-explanatory: there will likely be four bolts, either attaching the stereo to a bracket at the back or on either side. Determine the size of the bolts, then use a hand wrench to remove them. Some brackets won’t require that you remove the bolts completely, but may just need you to loosen them sufficiently to slide the stereo out.
- There may be a trim “faceplate” over the stereo that pops off, revealing bolts in the face of the stereo instead of behind it. Unscrew these bolts and slide the stereo out.
- Remember that the stereo is still connected to the car with wires, so be careful not to rip any out as you remove the stereo from the Disconnect the wiring. If you are removing a stock head unit, there will likely be at least one plastic clip with a number of wires going into it that you will need to disconnect. There may be a second clip and an antennae cable as well in some cars. These few clips consolidate all the wiring required to connect the stereo to the car’s power source, the antennae and each of the speakers. If you are removing an aftermarket stereo, there is a possibility that there will be no clip and the previous stereo was wired loosely. If that is the case, you may have to cut the wires in order to connect them to the new head unit.
- Do not pull the wires out of the clip. If you are able to purchase a harness adaptor for your new stereo, it will plug directly into the car’s existing clip.
- Be careful when removing the wire harness clip from the back of the stereo. It may have a plastic button or tab holding it in place.
Part 2 Wire the New Stereo 1 Purchase a wiring adaptor. Your new stereo will come with a diagram indicating what each wire is and what it needs to be connected to, but that process can be made much simpler by using a wiring harness clip adaptor. These adaptors are made to make it easy to connect your new stereo to the car’s existing clip. Use the diagram provided with the stereo as well as the diagram provided with the clip, to loosely connect each of the wires to the new adaptor. 2 Identify and connect loose wiring. If you are not using a wiring harness clip adaptor, you will need to identify the wires coming out of the stereo, as well as those coming out of the car. Without an adaptor, you will need to cut the wires on the back of the car’s harness clip, but do so one at a time as you connect them to their corresponding wire on the stereo to prevent confusion. Use the repair manual for your car or locate a wiring diagram for your car online to aid in your efforts to identify each wire. Most car stereos will require the following connections: - The power wire coming from the stereo is usually red, and likely will connect to a red wire from the car.
- The ground wire for the stereo will be black, as will its corresponding wire from the car. If there is no ground wire, you can secure the ground cable to bare metal in the body of the car to serve as a ground.
- The 12 volt constant power wire is usually yellow or blue, though it may be a number of colors coming from the car.
- The rest of the harness wires are for the speakers. Use the diagrams to properly match each with its appropriate wire from the car.
- The antenna wire is much thicker with a metal head and can be connected separately before you install the stereo. These wires are usually short and won’t be reconnected until you are about to install the new Connect the output convertor if necessary. Some vehicles will require an output converter to make it work properly with components of the car that are not common industry wide. Some automakers use external amplifiers the stereo’s signal will need to compensate for. Your stereo may have come with an output convertor, but it’s more likely that you will need to order it from an auto parts or electronics store. Be sure you order an output converter designed specifically for your year, make and model vehicle.
4 Secure all connected wires. Once all of the wiring has been connected to their corresponding wires, you will need to make those connections permanent. There are a number of ways you can permanently bond two wires together and while some may be more resilient than others, most will work just fine for car stereo applications. Be sure there is no bare wire metal showing from any of the wire connections by wrapping them in electric tape or heat-shrink wrap. - Soldering two wires together requires a soldering iron and solder. You melt the solder onto the wires to stick them together and as the solder cools it forms a permanent bond.
- Twisting wires together and then covering them with heat-shrink wrap or electric tape will suffice for car stereos.
- Connectors can be purchased that you simply slide both wires into and either crimp them together with pliers or twist them together with your fingers.
Part 3 Install the New Stereo 1 Test the stereo. Before you install the stereo in the center console of your vehicle, reconnect the battery and turn the car on to make sure it is functioning properly. With the stereo completely connected, turn it on and try a few functions. Make sure all speakers in your vehicle are working and that CDs or your MP3 player play properly. If you have been able to connect the antennae cable already, check to make sure the radio works. - Checking the stereo’s functions now will prevent you from having to take the console apart again to address any issues with the wiring.
- If something does not work properly, review the connections with the wiring diagrams that you have to make sure all of the wires are connected to their corresponding match.
- Remove the keys and disconnect the battery again after you’ve tested the Tuck all of the wiring into the dashboard. You may have noticed that most of the wires you connected to your stereo allowed for quite a bit of slack. Take the connected car stereo in one hand and use the other to tuck all of the extra wire back into the dashboard as you set the stereo in its opening. If you have not been able to connect the large antennae cable yet because it was too short, connect it now as you sit the stereo in its place.
- Be careful not to pull any wires out of the back of the stereo as you tuck them back into the dash board.
- Try not to let the wiring get in the way of the bracket you will need to bolt the stereo too (if your stereo requires being bolted into Secure the new stereo. If your stereo utilizes spring clips, it will click as it locks in place and you will not need to take any further action to secure the stereo. If yours uses bolts and brackets, reuse the bolts you removed earlier to secure the new stereo in the same place. If you had to use an adaptor to properly fit the stereo in its space in the console, ensure the stereo is secured to the adaptor and that the adaptor is secured to the car.
- If you use bolts, make sure they are snugly tightened before reinstalling the trim.
- Once done, try to wiggle the stereo. It should hardly move at all when properly Reinstall the trim. Being careful not to break any of the plastic clips that hold the trim in place, reinstall each piece in the opposite order you removed them. That means you should install the last piece you removed first, followed by the second to last, and so on. This will make sure overlapping pieces are layered properly.
- If you break a clip and the trim won’t stay in place, you can use a hot glue gunto secure trim pieces to your car, but be aware that it will make it more difficult to remove those pieces again in the future.
- If you break an entire trim piece, you will likely need to special order a replacement from the dealership, as most auto parts stores don’t carry trim Why can't turn on the car radio ?
Please check the Voltage of car radio: 12V When you test this car radio,you can combine the red and yellow wires and connect them to the positive side of the power supply.Black line to negative power supply. Replace the same type of insurance to test the car radio. Note:Please must use our power cables to connect our car radio,it is not possible to insert the original car plug directly into our machine. Q2. Why the car radio will show "No Signal" when we reversing? Please check if the camera's line is properly connected to the car radio.Note:The video port of rear camera must insert the "CAMIN" port of car radio. Q3. Why does the camera display "!" and "Can't watch video while driving" when I use USB to watch videos? Please turn off the "Video Warning" function in the settings,then will be OK. Q4. Why can't search FM? No radio antenna inserted. Please check if the radio antenna is plugged in. Please insert more antennas several times to make it well contacted. The signal of your location is not good. Please go to a better place to test again. The radio antenna on the car is broken/no effect; please replace the radio antenna and test again. Q5. Why can't connect the Bluetooth of car radio? Open the phone settings interface, open Item SpecificsBluetooth :5.0Apple CarPlay :Support Wireless/Wired ConnectionScreen :8 inch Capacitive Touch ScreenUnit size :2 DinFeature :Bluetooth,Sat Nav Compatible,Touchscreen,Steering wheel controlGPS Navigation :Online/OfflineAudio format :MP3 MP2 AAC OGG FLAC APE WMA WAV RM AC3Placement on Vehicle :FrontUnit Type :UnitManufacturer Warranty :10 YearsVoltage :12VUnit Size :2 DINOperating System :ANDROID 13.0Radio Band :FMSteering Wheel Control :SupportAndroid Auto :Support Wireless/Wired ConnectionPower output :4*45WBackup Camera :IncludedDAB+ Input :Yes(Need to buy DAB BOX extraBrand :UnbrandedMemory :4GB(RAM) 64GB(ROM)Screen size :8inch 2.5D Capacitive touch screenResolution :1280*720 Pixel Support 1080P videoDSP :SupportFitment Type :Plug and PlayMaterial :plastic, metal
PaymentShippingReturnsContact Us 1. We accept payment via PAYPAL only. 2. Payment must be made within 4 days of sale closing. 3. Total amount due includes the final sale price plus S&H(Shipping and Handling). 1.Our shipping rates include the cost of shipping,handling,packaging and related manpower costs.
2.All item will be shipped within 1 business days,It takes approximately 3-8 workdays.
3.All items will be shipped to buy's paypal address.Please check your paypal address is right.
4.We are not responsible for wrong or undeliverable address.We reserve the right to charge the shipping fee again for returned items due to wrong address. 1.Please contact us via Message if you have NOT received item in 30 days, we will check it with post office, and then resend or refund any missing item.
2.in the unlikely event that your product is faulty in anyway, you must contact us ASAP and then return it within 7 Days of receipt.
3.Return shipping fee should be paid by buyer if wrong item you bought (wrong model or wrong color) and item is defective. We will provide replacement or refund after we received and confirmation.
4.if you need return, please contact and get an address for return from us.
5.All return products should be with all accessories included. If there have any question pls contact us first(send us message),we will try our best to help!
All rights reserved.
|
|

Related Cars:

1996 Porsche 911 Turbo

2000 Volkswagen New Beetle RSi

2010 Gemballa MIG-U1
2008 PPI PS TT

2013 Jaguar F-Type
2011 Ford Mustang GT

2006 Porsche Cayenne Turbo S

2005 Ford GT

2010 Brabus T65 RS

1955 Mercedes-Benz 300SLR
Related Items: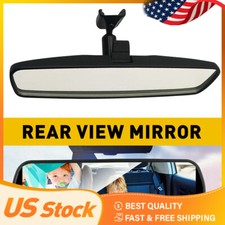
8 For Universal Black For Universal View Rear Mirror Interior Replacement EW $17.09
420907660 Oil Level Sensor For Audi R8 For Lamborghini Gallardo LP550-2 LP560-2 $489.00
2+32GB 8" For 2015 2016-2020 Ford F150 Android 15 Car Stereo GPS Radio Carplay $218.49
|