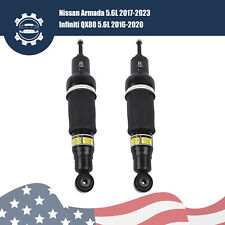
✈Compatibility Chart1, You can distinguish specific model of an automobile by VIN(Vehicle Identification Number).2, VIN(Vehicle Identification Number) consists of total 17 English letters and arabic digits.3, VIN does not include the letters I (i), O (o), and Q (q) (to avoid confusion with numerals 1 and 0).1990-1997 Mazda Miata✈OEM Part GuidelineStep 1: Before you lift the vehicle, loosen lug nuts one full turn.Step 2: Jack up vehicle and use jack stands for safety & remove the tire from the rotor. Pair Rear Left and Right Shock Strut Assembly For 1990-1997 Mazda Miata 1.8L
✈Compatibility Chart
1, You can distinguish specific model of an automobile by VIN(Vehicle Identification Number).
2, VIN(Vehicle Identification Number) consists of total 17 English letters and arabic digits.
3, VIN does not include the letters I (i), O (o), and Q (q) (to avoid confusion with numerals 1 and 0).
1990-1997 Mazda Miata
✈OEM Part Guideline
Step 1: Before you lift the vehicle, loosen lug nuts one full turn.
Step 2: Jack up vehicle and use jack stands for safety & remove the tire from the rotor.
Step 3: (Wheel alignment is necessary after strut replacement.) Marking the position of all the bolts will help
keep the alignment close to original and save time aligning. Use a colored pencil to mark the old strut on the bolt.
Step 4: Use penetrating oil (such as WD40) to coat any rusted fasteners, let soak for approximately 1 hour.
Step 5: (Optional) While waiting for oil to soak, take this time to inspect all other components that may need
replacement (brake pads, rotors, brake hoses, ball joints, CV boots, tie rod ends, bushings, sway bars, etc).
Step 6: Remove any brake line or wire attachments from the strut body. Do not disconnect brake lines (if possible)!
Opening brake lines will require bleeding of the brake system.
Use extreme caution when removing brake lines from your struts, as any damage to your brake line can result in
expensive and time consuming repairs.
Step 7: Remove sway bar attached to the strut assembly or control arm.
Step 8: Remove the tie rod (only if it attached to the body of the strut, if not leave it attached to the steering knuckle).
Step 9: Remove the strut to knuckle bolts at the bottom of the strut. On some vehicles, the brake caliper and rotor
may need to be removed to gain access.
Step 10: Remove the upper mounting plate bolts located in the engine or trunk compartment. Do not remove the
center retaining nut! It is not safe to unload the spring from the assembly in this position.
Step 11: Carefully remove the old strut assembly from the vehicle. Be very cautious not to let the strut "drop" down
on your brake line, rotor or drum.
Step 12: Install the new Complete Strut Assembly in the reverse order as above (steps 11-6). Using an anti-seize
compound on all fasteners is suggested.
Step 13: Carefully double check your work and make sure everything is tightened to manufacturers torque specifications.
Step 14: Replace the tire the rotor and tighten to manufacturers torque specifications.
Step 15: Slowly lower the vehicle down after removing the jack stands. Pay very close attention to any odd sounds
when the vehicle is lowered onto the new Complete Strut Assemblies.
Step 16: It is very important that you immediately "road test" your vehicle right away to ensure that installationwas done properly.
Listen and feel for common signs of incorrect installation while driving slowly over speed bumps, rough road or potholes.
✈Removal Guideline
Installation is in reverse order of Struts Shocks removal.
✈Features and Benefits
- Hardened Rods & NOK Seals;
- Precision Robotic Welding;
- Top Factory Certifications;
- Premium Powder-Coated Finish;
- Damper Engineered for Each Vehicle Application's
- OE or Better Performance Level
✈Item Specifications
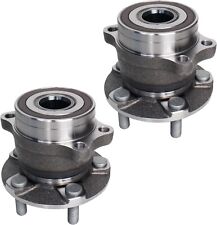
- Key Words:Pair Rear Left and Right Shock Strut Assembly For1990-1997 Mazda Miata
- Package Includes:Pairfor Rear Left andRightStruts Shocks
Notes: Please double confirm the compatibility as well as the OEM number before purchasing.
Instruction is not included. Professional installation is recommended.
- The struts/shocks are nitrogen gas charged and tuned for each specific vehicle application.
- They will greatly improve the ride, handling,and safety of your vehicle
Item SpecificsBrand cfspeed-autopartsManufacturer Part Number C80353701APSType StrutFitment Type Direct ReplacementPlacement on Vehicle LeftManufacturer Warranty 1 YearFeatures AdjustableModified Item NoAdjustable NoGas Charged Shock YesInterchange Part Number CB341127OE Part Number CB71245Kit or Single Part KitKit Parts Included Set of two rear strutsSurface Finish Powder CoatOE Spec or Performance/Custom OE SpecColor Gloss BlackReturn Policy Free return or replacement within 30 daysShock Absorber System Double PipeShock Absorber Type GasVintage Car Part NoMaterial SteelMounting Style Screw-OnPerformance Part NoQuantity 2PcsSuperseded Part Number Shock and StrutUniversal Fitment NoCompressed Length 10.000"(R)Travel Length 5.000"(R)Included Hardware Mounting HardwareItem Length 15.000"(R)Package Dimension (in.) 17.72*8.66*4.53Gross Weight (LB) 8.598Feature ESCPPackage Dimension (in.) 17.72*8.66*4.53Gross Weight (LB) 8.598
Payment
- PayPalpreferred.
WARNING: Cancer and Reproductive Harm - www.P65Warnings.ca.gov. Us We are dedicated to provide high quality products and satisfied customer service to our sincerely customers, so if there's any questions or problems with our products or service, feel free to contact us please.
DESCRIPTIONPAYMENTSHIPPINGRETURN POLICYCONTACT US Shop CategoryStore Home Suspension Parts◈Air Strut Assembly◈Air Spring◈Air Suspension Compressor◈Solenoid Valve Block Truck & Trailer Springs Suspension Kits Air suspension valves solenoid Shocks & Struts Struts & Suspension Kit & Hubs coilovers complete strut Brake System Parts◈Brake Calipers◈Brake Drums & Brake Shoes◈Brake Pads & Brake Shoes Lift Supports Bumper Assembly Steering Knuckle Mass Air Flow Sensor Strut Mount air dryer Power Brake Booster trim tilt motor Removal Tool Control Arm Camber Arm dipstick Cylinder Piston Kit snorkel air intake Ballast Module Horns & Sirens OtherHot Item Pair Front Complete Strut & Coil Spring Assembly For 2009-13 Toyota Corolla USD 92.99 For 07-2012 Nissan Versa Front Struts Lower Control Arm Tierod Sway Bars 10pcs USD 149.99 Rear Pair Air Suspension Air Spring For Lincoln Town Car Mercury Grand Marquis USD 58.59 Pair Front Left and Right Shock Strut Assembly For Chevrolet Equinox GMC Terrain USD 58.59 For Truck Cap Topper Window Leer Camper Shell 17inch/35Lb Strut Shock Gas Spring USD 19.33 PictureNew List Item 4PCS FH&RH Complete Strut & Coil Spring Assemblies For 2004-2009 Toyota Prius USD 208.28 For 2013 14 15 16 17 18 Ram 1500 Front Upper Bumper Cover Primed 2PCS CH1014108 USD 132.65 Pair Front Left and Right Shock Strut Assembly For 2000-2005 Ford Focus LX SE USD 62.90 Front Complete Struts w/ Springs & Rear Shock Absorbers For 2003-08 Honda Pilot USD 230.98 Pair Front Complete Strut & Coil Spring Assembly For 2007-2009 Lexus ES350 USD 161.97 Help & InfoPayment PolicyShipping PolicyReturn PolicyFAQAbout Us Pair Rear Left and Right Shock Strut Assembly For 1990-1997 Mazda Miata 1.8L ✈Compatibility Chart
1, You can distinguish specific model of an automobile by VIN(Vehicle Identification Number).
2, VIN(Vehicle Identification Number) consists of total 17 English letters and arabic digits.
3, VIN does not include the letters I (i), O (o), and Q (q) (to avoid confusion with numerals 1 and 0).
1990-1997 Mazda Miata
✈OEM Part Guideline
Step 1: Before you lift the vehicle, loosen lug nuts one full turn.
Step 2: Jack up vehicle and use jack stands for safety & remove the tire from the rotor.
Step 3: (Wheel alignment is necessary after strut replacement.) Marking the position of all the bolts will help
keep the alignment close to original and save time aligning. Use a colored pencil to mark the old strut on the bolt.
Step 4: Use penetrating oil (such as WD40) to coat any rusted fasteners, let soak for approximately 1 hour.
Step 5: (Optional) While waiting for oil to soak, take this time to inspect all other components that may need
replacement (brake pads, rotors, brake hoses, ball joints, CV boots, tie rod ends, bushings, sway bars, etc).
Step 6: Remove any brake line or wire attachments from the strut body. Do not disconnect brake lines (if possible)!
Opening brake lines will require bleeding of the brake system.
Use extreme caution when removing brake lines from your struts, as any damage to your brake line can result in
expensive and time consuming repairs.
Step 7: Remove sway bar attached to the strut assembly or control arm.
Step 8: Remove the tie rod (only if it attached to the body of the strut, if not leave it attached to the steering knuckle).
Step 9: Remove the strut to knuckle bolts at the bottom of the strut. On some vehicles, the brake caliper and rotor
may need to be removed to gain access.
Step 10: Remove the upper mounting plate bolts located in the engine or trunk compartment. Do not remove the
center retaining nut! It is not safe to unload the spring from the assembly in this position.
Step 11: Carefully remove the old strut assembly from the vehicle. Be very cautious not to let the strut "drop" down
on your brake line, rotor or drum.
Step 12: Install the new Complete Strut Assembly in the reverse order as above (steps 11-6). Using an anti-seize
compound on all fasteners is suggested.
Step 13: Carefully double check your work and make sure everything is tightened to manufacturers torque specifications.
Step 14: Replace the tire the rotor and tighten to manufacturers torque specifications.
Step 15: Slowly lower the vehicle down after removing the jack stands. Pay very close attention to any odd sounds
when the vehicle is lowered onto the new Complete Strut Assemblies.
Step 16: It is very important that you immediately "road test" your vehicle right away to ensure that installationwas done properly.
Listen and feel for common signs of incorrect installation while driving slowly over speed bumps, rough road or potholes.
✈Removal Guideline
Installation is in reverse order of Struts Shocks removal.
✈Features and Benefits
- Hardened Rods & NOK Seals;
- Precision Robotic Welding;
- Top Factory Certifications;
- Premium Powder-Coated Finish;
- Damper Engineered for Each Vehicle Application's
- OE or Better Performance Level
✈Item Specifications
- Key Words:Pair Rear Left and Right Shock Strut Assembly For1990-1997 Mazda Miata
- Package Includes:Pairfor Rear Left andRightStruts Shocks
Notes: Please double confirm the compatibility as well as the OEM number before purchasing.
Instruction is not included. Professional installation is recommended.
- The struts/shocks are nitrogen gas charged and tuned for each specific vehicle application.
- They will greatly improve the ride, handling,and safety of your vehicle
Item SpecificsBrand :cfspeed-autopartsManufacturer Part Number :C80353701APSType :StrutFitment Type :Direct ReplacementPlacement on Vehicle :LeftManufacturer Warranty :1 YearFeatures :AdjustableModified Item :NoAdjustable :NoGas Charged Shock :YesInterchange Part Number :CB341127OE Part Number :CB71245Kit or Single Part :KitKit Parts Included :Set of two rear strutsSurface Finish :Powder CoatOE Spec or Performance/Custom :OE SpecColor :Gloss BlackReturn Policy :Free return or replacement within 30 daysShock Absorber System :Double PipeShock Absorber Type :GasVintage Car Part :NoMaterial :SteelMounting Style :Screw-OnPerformance Part :NoQuantity :2PcsSuperseded Part Number :Shock and StrutUniversal Fitment :NoCompressed Length :10.000"(R)Travel Length :5.000"(R)Included Hardware :Mounting HardwareItem Length :15.000"(R)Package Dimension (in.) :17.72*8.66*4.53Gross Weight (LB) :8.598Feature :ESCPPackage Dimension (in.) :17.72*8.66*4.53Gross Weight (LB) :8.598
Payment - PayPalpreferred.
Shipping Returns WARNING: Cancer and Reproductive Harm - www.P65Warnings.ca.gov. Contact Us We are dedicated to provide high quality products and satisfied customer service to our sincerely customers, so if there's any questions or problems with our products or service, feel free to contact us please.
All rights reserved.