Features:
- Constructed of lightweight 1-7/8\" diameter, 18-gauge, mandrel bent 304 stainless steel primary tubes maximizing strength and durability
- Merged collectors for maximum flow and increased exhaust velocity
- 3/8” thick precision water jet cut flanges for less warping, maximum sealing surface, and better seal
- 100% hand welded construction
- Hand blended welds at the flange entry for maximum flow and better performance
- Quality welds for strength, longevity, and good looks
- Manufacturer’s Limited Lifetime Warranty
Installation:
Pre-installation
1. Place vehicle on flat solidsurface class=\"MsoBodyText\" style=\"margin-top: 12.5pt; margin-left: 3.35pt;\">2. Disconnect the negative terminal of the battery.
3.Lift the vehicle and support with jack stands.
4. Straighten the front wheels andlocksteeringcolumn.
5. Soak studs on catalytic converter withpenetratingoilor WD-40
Removal Of OEMExhaust Manifolds & CatalyticConverters:
1. Loosen the15mmnuts securing the slide the coupler away fromthestop.
2. Unplug the left class=\"MsoBodyText\" style=\"margin-top: 12.2pt; margin-left: 0.25pt;\">3. Remove15mm nuts securingthecatalyticconvertersto bay with good quality deep well socket.Remove the catalytic converters from the bottom.
4. Remove the spark(x8)plugs and wires.
5. Remove thebolt securing the class=\"MsoBodyText\" style=\"margin-top: 11.95pt; margin-left: 0.5pt;\">NOTE: Take a digitalphotograph(or a goodmentalpicture) ofhow thetubeisrouted,it class=\"MsoBodyText\" style=\"margin-top: 12.35pt; margin-right: 5.6pt; margin-left: 17.9pt; text-indent: -17.7pt;\">6. Remove the(x6)bolts(13mm socket) that attachEACHexhaustmanifoldto thebottom. Be carefulnot todamage thecoolant temperaturesensor onthedriver’sside.
1. Clean the exhaust portsealingsurfacetoremoveanydirtor thegasketand causeleaks. Repair any damaged threads orbrokenbolts.
2. Remove thekey from the ignitionandmakesurethesteering wheelislocked.Removethe11mmshoulderbolt fromthesteeringshaft coupler on the steering rack. Pushbackthe shaftasfaraspossible.
NOTE: Avoidmoving the steering shaft, steeringrack, or turning a steering service code on vehicles equipped withelectricsteeringassist.
3. Install theLEFT(driver’s from underneathbefore theheader is bolted to thecylinderhead.Thisismucheasier than fromontopafter theheaderisinstalled(butnotnecessary). Take carenot to damage the spark plug fewthreads to hold theheaderinplace.
IMPORTANT! Re-install the steering shaft to the class=\"MsoBodyText\" style=\"margin-top: 12.1pt;\">4. Install to hold theheader in place.Installation of theheaderisinplace.However, they canbeinstalled before the header.Extreme caremustbe class=\"MsoBodyText\" style=\"margin-top: 10.3pt; margin-right: 12.65pt; margin-left: 36pt; text-indent: -35.5pt;\">NOTE: If your vehicle has willnotclearthe starter, youmay have toremove thestarter or simply trim off theexcessstud.
5. Working from the engin on the flange. Remove therear header bolt andreinstall oncethegasketiscorrectlyaligned bolts. Tighten the bolts from the center of the flange Donot overtighten the header class=\"MsoBodyText\" style=\"margin-top: 12.2pt; margin-left: 18.55pt; text-indent: -18.35pt;\">6. Install thepassenger’s sideOEM the frontof theheader flange.Remove therear header bolt andreinstall once the bolts.
7. Install the dipstick tubeafter checkingtheconditionof tubes whilethebolts are loose.Make sure the from the center of the flange to the ends evenly bolts. Install the dipstick mounting bolt and tighten to the manufacturer\'s specifications.
8. Install starter (ifremoved).
9. Inspect the OEM gasketon first. Tighten the fasteners evenly toprevent to set the flanges evenly and snug. They willneed tobeadjusted for fit class=\"MsoBodyText\" style=\"margin-top: 2pt; margin-left: 17.7pt;\">fasteners after the exhaustis connected to the catalytic converters.
10. Reinstall the O2 sensorsandplugin theconnectors.Keepharnessesaway fromtheexhaustpipes.
11. Reconnect the exhaust system to thecatalyticconverters.Fullytightenthe fastenersattheheadercollector flange.Tightentheexhaust couplers to specification.
NOTE: Using a 6”lengthof vacuumhose areas. Use a spark plug socket with wrench flats and a box wrench to tighten the spark plugs.
12.Install the 45° degree sparkplug wireset.
13. Recheck you work. Verify all class=\"MsoBodyText\" style=\"margin-top: 12.2pt; margin-left: 0.6pt;\">14. Remove the jack standsandlower thecar.
15. Connect the battery, start the engine, and check for leaks.Re-check your work before lowering the car.
16. After150milesrecheck all connectionsandclamps.
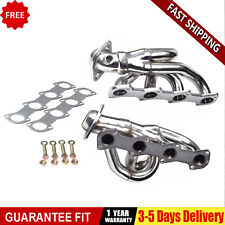
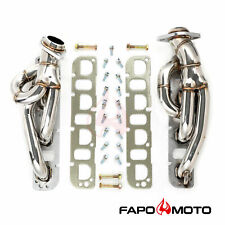
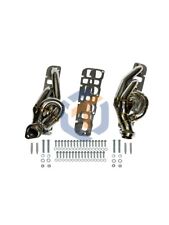
Note: The items you received are shown in the figure. If you have any questions later, please contact the after-sales staff in time